Nah, its a secret weapon everyone has. But mine is a MODIFIED weapon and I shall tell you why.*evil laugh* But first, let me show you my base army: OPI base coat, that prepares everything before the war starts. I've not try any other base coat other than this so I cannot tell you which is the best. At least it works for me. As for the top coat, i think everyone would have to agree with me that Seche Vite is the holy grail of topcoat.
Now onto the "Commander": I hired him at a very cheap price, like a dollar or so from ebay and he works really hard for me (sometimes OT too!) LOL. This is the usual brush you see selling on ebay except I kinda trim the hair abit to have even thinner stroke.
Comparing normal brush with my brush.
Note: I ONLY use nail polish for all my nail art because thats the reason why I buy nail polish: to use them =) And by mixing different nail polish to achieve the color I want, I sometimes accidentally "fraken" some interesting color and effect too!
Now the Gloomy Bear tutorial request by MaryBeth.
I usually do tutorial when people request for it even if only 1 person ask for it. So feel free to ask me if you are interested in it. =D
Showing posts with label tutorial. Show all posts
Tuesday, June 28, 2011
Sunday, April 17, 2011
#1 Waterless Marble swirling nail art tutorial
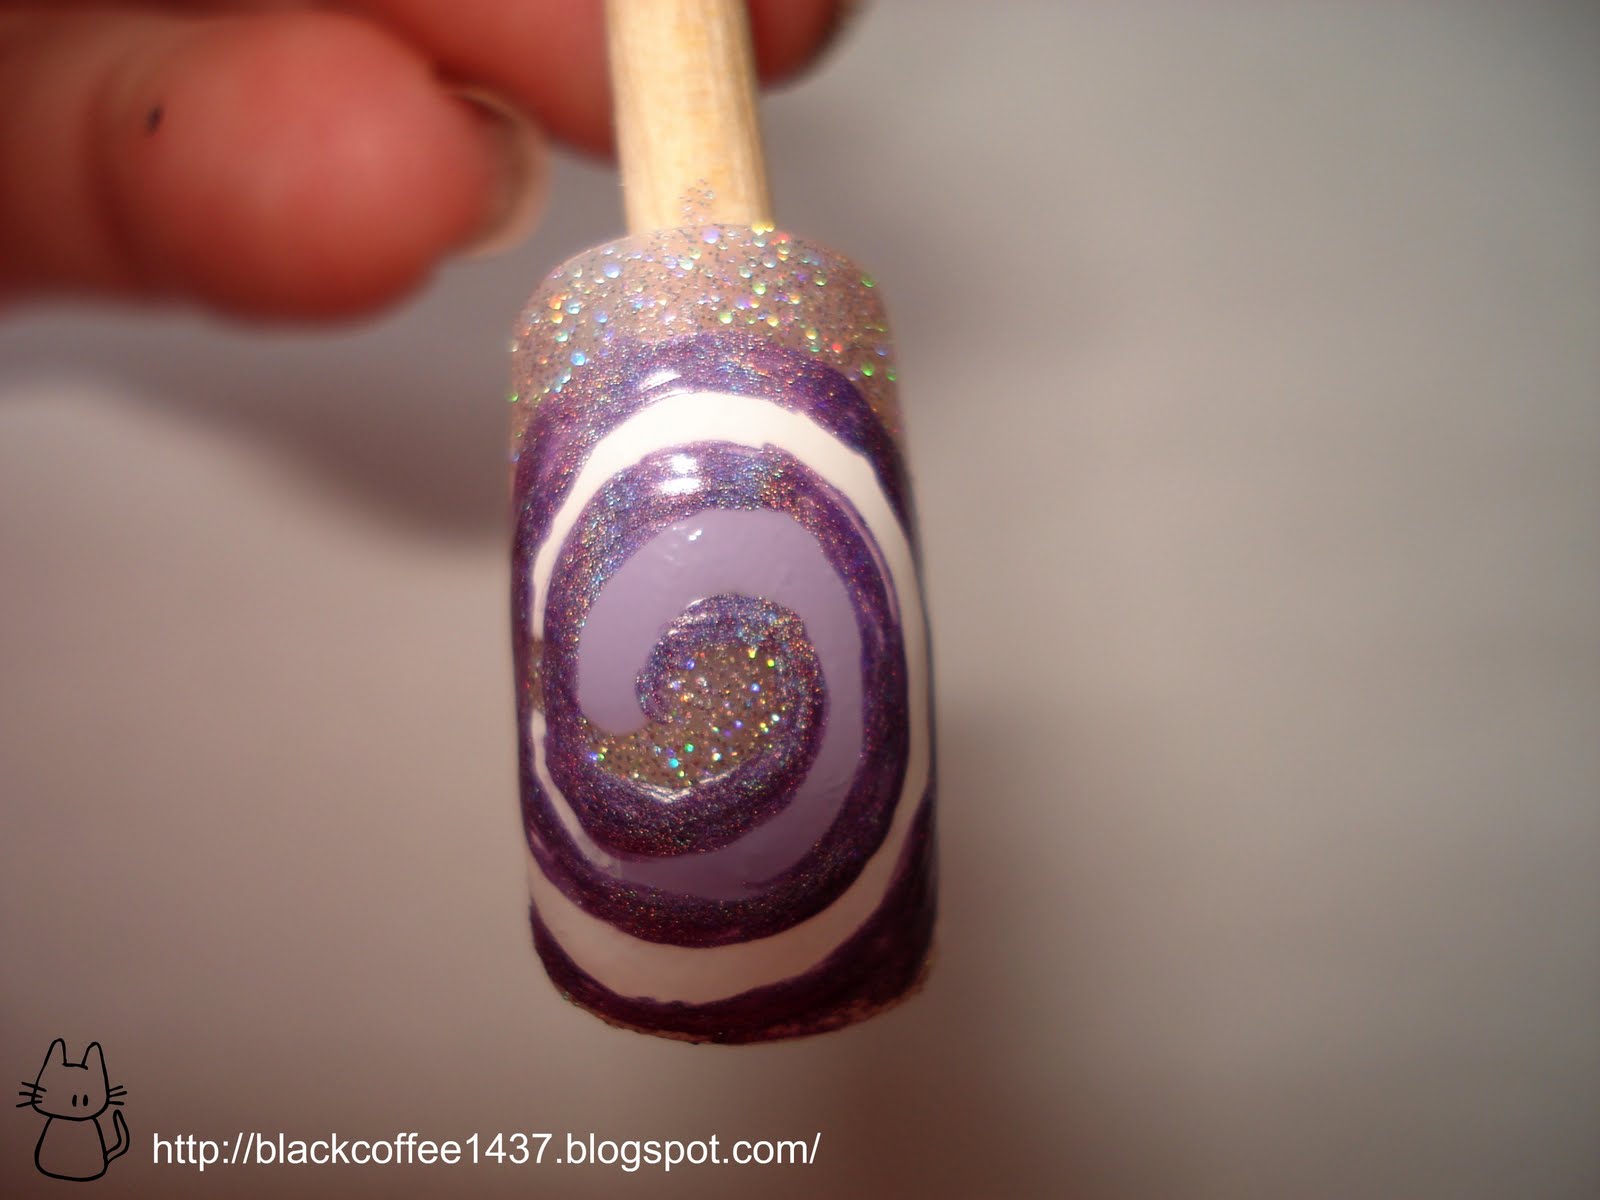
Sorry for the lack of post lately >.< and yes, the winner for the giveaway will be announce this evening!! How exciting!! But for now, this is a tutorial request from the lovely readers for the waterless marble swirling design. I've used some different technique in achieving the swirling design, and this first tutorial will show the easiest way to do it.
4) Then use any holographic polish to outline the swirl between the 2 colors. Doesn't have to be perfect.
TIPS: It's easier to fill in the color if you start with lightest cream color before using any darker holographic color. And for the best result, wait till the polish is semi-dry before applying the next color to prevent smudging.
Tadah!! You're done!! It doesn't seem that hard, isn't it?? I don't hate water marbling, its just that the cleaning part is messy and wasting nail polish especially my precious holographic nail polish, hehehe (my personal opinion). That's why I try to find the easiest way to achieve the same effect without using water. If you found an easier way to do this, let me know, I would love to try it out!! >.<
Have fun!! *Cheers*
First, apply a thin coat of any glitter polish after a layer of base coat.
2) Use a cream purple color or any color you desire to draw a circle.
3) Next, use a white polish to draw circle around the first circle.
5) Thicken the line, don't worry about the messyness.
6) The last step is the most critical but most fun part. Use the cream purple and white to randomly add in where you want the swirling effect to be.
7) (Optional) Add a small pink rhinestone in the center of the swirl.
8) (Optional) I added some hexagon glitter on the white part and finally a top coat.
TIPS: It's easier to fill in the color if you start with lightest cream color before using any darker holographic color. And for the best result, wait till the polish is semi-dry before applying the next color to prevent smudging.
Tadah!! You're done!! It doesn't seem that hard, isn't it?? I don't hate water marbling, its just that the cleaning part is messy and wasting nail polish especially my precious holographic nail polish, hehehe (my personal opinion). That's why I try to find the easiest way to achieve the same effect without using water. If you found an easier way to do this, let me know, I would love to try it out!! >.<
Have fun!! *Cheers*
Sunday, February 13, 2011
Holographic overloaded Tutorial
Greetings!!!! I'm glad everyone likes the holographic overloaded nail art and this is how i did it. Of course you are free to use any holographic nail polish you like. Enjoy and have fun!!!
Feel free to send me links/photos if you ever try this, i would love to see different design other than stars or different colors!! >.<
*Cheers*
OPI Coronation, Black Shatter and China Glaze IDK.
1) After base coat, apply 2 layers of CG IDK.
2) To achieve a more evenly crack look, apply just 1 thin layer of Black shatter.
3) Outline the shape of star with Coronation.
4) Then fill in the star.
5) This part is optional. Add some small or medium hexagon glitters and apply a top coat.
DONE!!!
Feel free to send me links/photos if you ever try this, i would love to see different design other than stars or different colors!! >.<
*Cheers*
Subscribe to:
Posts (Atom)